Installing Docker For Windows
Docker for Windows is a native application that is deeply integrated with Hyper-V virtualization and the Windows networking and filesystems. It is a full-featured development environment that can be used for building, debugging, and testing Docker apps on a Windows PC. It also works well with VPNs and proxies to make it easier when used in a corporate environment.
Docker for Windows supports both Windows and Linux containers out of the box, and it is easy to switch between the two to build your multiplatform applications. It comes with the Docker CLI client, Docker Compose, Docker Machine, and Docker Notary.
Recent releases have also added Kubernetes support so that you can easily create a full Kubernetes environment on your machine with just the click of a button.
Getting ready
Docker for Windows has the following system requirements:
-
64-bit Windows 10 Pro, Enterprise, and Education (1607 Anniversary Update, Build 14393 or later)
-
Virtualization must be enabled in BIOS and be CPU-SLAT-capable.
-
4 GB of RAM
NOTE
If your system does not satisfy these requirements, fear not—all is not lost. You can install Docker Toolbox (https://docs.docker.com/toolbox/overview/), which uses Oracle VirtualBox instead of Hyper-V. It isn’t as good, but it is better than nothing.
How to do it
To install Docker for Windows, go through the following steps:
-
Download Docker for Windows from the Docker Store athttps://store.docker.com/editions/community/docker-ce-desktop-windows. You will need to log in in order to download the installer. If you do not have a Docker account, you can create one at https://store.docker.com/signup.
-
Double-click the installation file that you downloaded from the store. It should be called something like
Docker for windowsInstaller.exe:
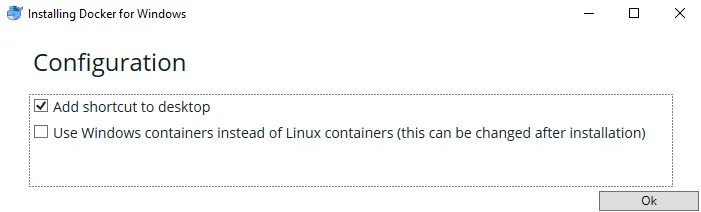
Once the installation is complete, it will automatically start up. You will notice a little whale icon in the notification area of your task bar. If you need to change any settings, right-click on the icon and select Settings.
- Open up a command-line terminal and check to make sure that the installation is working:
$ docker container run hello-worldHow it works…
This recipe will show you how to install a Docker development environment on your Windows machine.
There’s more
Now that you have Docker for Windows installed, check out the following tips to get the most out of your installation:
- Docker for Windows supports both Windows and Linux containers. If you want to switch, you just need to right-click on the whale icon, select Switch to Windows containers…, and then click the Switch button:
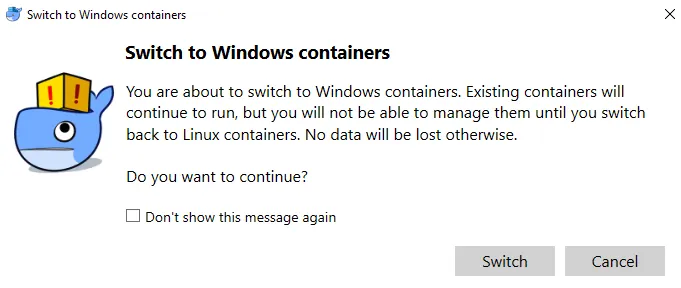
To switch back, do the same thing, except this time, select Switch to Linux containers…
-
Docker for Windows will automatically check for new updates and let you know when a new version is available to install. If you agree to upgrade, it will download the new version and install it for you.
-
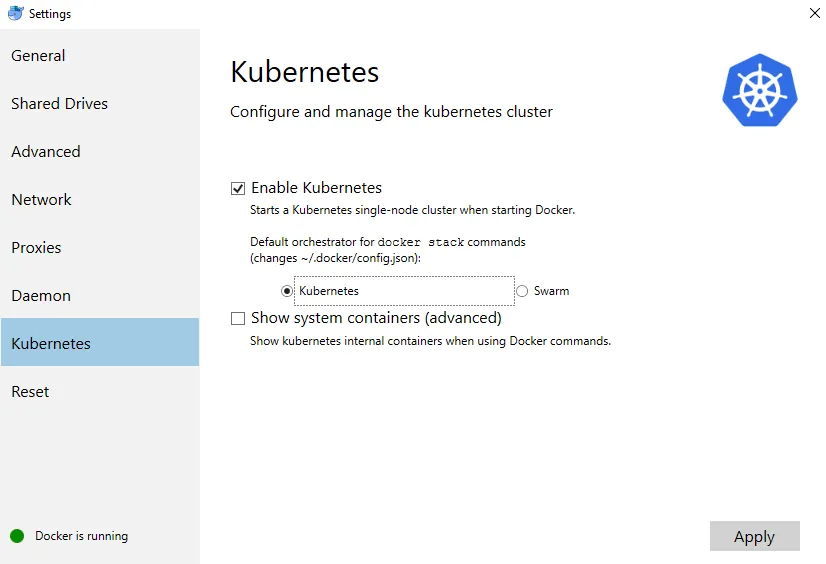
Kubernetes doesn’t run by default. If you want to turn it on, you will need to right-click on the Docker whale icon in your task bar, then select Settings. Inside the Settings menu, there is a Kubernetes tab. Click on the tab, and then click the Enable Kubernetes option and hit the Apply button:
See also
For more information about Docker for Windows, and for links to labs and more examples, go to https://docs.docker.com/docker-for-windows/.